
Sunday, 24 June 2012
Right now, my home smells like a bakery ...
Today I've baked gooey chocolate brownies, a classic Victoria sponge cake, lemon cupcakes and oat biscuits ... all in preparation for taking into the office on Tuesday. My birthdays is always a busy baking time for me, but I wouldn't have it any other way.
Saturday, 23 June 2012
Recipe #23 of NEWrecipes52 ...
My influence remains firmly in the east again this week. I've owned a Thai cookery book for many years now, but rarely tried any of the recipes from it! So I figured it was about time that changed. I thought I'd keep things relatively simple and make a warm Asian chicken salad.
Gathering of ingredients, including Chinese leaf (new to me!), sesame oil, Chinese 5 spice, chili and rice noodles ...

First, grate some fresh root ginger and add it to 2 tablespoons of flour, mixed with half a teaspoon of both Chinese 5 spice and chili powder ...

Thinly slice 2 chicken breasts and coat with the seasoned flour ...

The chicken is cooked over a medium / high heat for around 5-6 minutes, then set aside & kept warm whilst the rest of the salad components are prepared.

Soften the rice noodles by pouring "just boiled" water over them and allow them to rest for a couple of minutes ...

Then rinse under cold water to stop them from over-cooking ...

Shred the Chinese leaf, thinly slice some cucumber and use a vegetable peeler to get ultra thin slithers of carrot, drizzle the lot with a dressing of olive oil and lime juice ...

Add the rice noodles to the frying pan, along with the cooked chicken and warm through ...

To serve, pile the warm noodles and chicken on top of the dressed salad and top off with a generous garnish of fresh coriander ...

The whole meal took less than 30 minutes to prepare and cook and that even included the time it took me to take the photos for this blog post. Result!
Saturday, 16 June 2012
Recipe #22 of NEWrecipes52 ...
You know the Thai recipe I mentioned in my last post? Well, I finally got round to trying it last night ... and it was good! I made a prawn Thai red curry which was hot & spicy and oh so easy.
The sauce ingredients are simple ...

And of course the star attraction are beautifully fresh, succulent king prawns ...

I sliced 4 spring onions and gentle fried them in a little vegetable oil for around 2 minutes, to soften. Then I added a "bruised" lemongrass stalk and about an inch of freshly grated root ginger ...

I added about 300ml of coconut milk, 2 tbs of [shop bought] Thai red curry paste and about 1 tsp of light soy sauce to create a delicious sauce ...

With the sauce well mixed and just coming to the boil, I added the prawns and a small hand full of chopped coriander, then cook for around 5 minutes or until the prawns are cooked through. You can tell when the prawns are cooked because they'll turn from a rather ugly grey colour to a very lovely pale pink colour ...

I served the prawns on a bed of fluffy, white, long grain rice and garnished with some more chopped coriander ...

Now in my book, the sign of a good curry is that it always makes my nose run (I know it's gross to say it, but it's true!) and as I ate this last night, I had a box of Kleenex by my side ... tee-hee!
The sauce ingredients are simple ...

And of course the star attraction are beautifully fresh, succulent king prawns ...

(note to self: don't put raw prawns into a steel colander & expect the photo to look good!)
I sliced 4 spring onions and gentle fried them in a little vegetable oil for around 2 minutes, to soften. Then I added a "bruised" lemongrass stalk and about an inch of freshly grated root ginger ...

I added about 300ml of coconut milk, 2 tbs of [shop bought] Thai red curry paste and about 1 tsp of light soy sauce to create a delicious sauce ...

With the sauce well mixed and just coming to the boil, I added the prawns and a small hand full of chopped coriander, then cook for around 5 minutes or until the prawns are cooked through. You can tell when the prawns are cooked because they'll turn from a rather ugly grey colour to a very lovely pale pink colour ...

I served the prawns on a bed of fluffy, white, long grain rice and garnished with some more chopped coriander ...

Now in my book, the sign of a good curry is that it always makes my nose run (I know it's gross to say it, but it's true!) and as I ate this last night, I had a box of Kleenex by my side ... tee-hee!
Sunday, 10 June 2012
Recipe #21 of NEWrecipes52 ...
I had originally intended to try a Thai influenced recipe this weekend, but seeing as I didn't go food shopping until this morning, I didn't really have enough time to prepare all the ingredients and take all my usual photos. But fear not, I do still have a new recipe to share with you, although it's back to the sweet stuff!
There are some flavour combinations that just work better when they're together ... like rhubarb & custard, strawberries & cream or cheese & pickle! The same can be said of chocolate & orange ... a classic flavour pairing, that compliments each other perfectly. So this week's new recipe is a chocolate & orange marble loaf ... tasty & pretty!
It starts with all the usual cake requirements ...

I ♥ bitter dark chocolate and I think it works particularly well with the tangy orange zest. This recipe has BOTH! Start by melting the chocolate over a bain marie ...

Once melted, take it off the heat and allow it to cool down, but not re-set. Whilst it's cooling, cream together butter and sugar ...

Gradually mix in the eggs, making sure they're thoroughly combined, then add the grated zest of an orange ...

Add sifted flour and fold into the butter, sugar & egg mixture. Divide the batter into two bowls and add the cooled, melted chocolate and cocoa powder to one of them, combine together ...


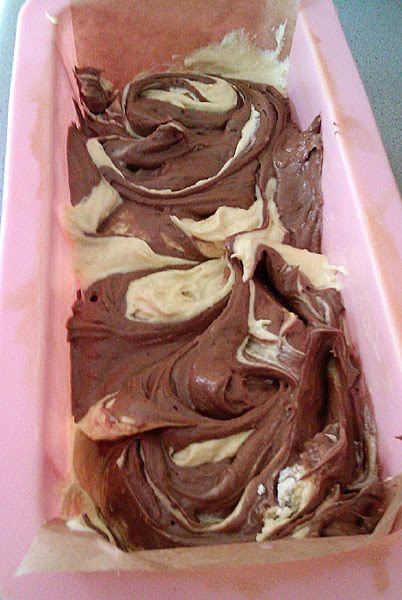
Take spoonfuls of each of the batter mixtures and alternate them in a prepared baking tin / silicon mould ...

Take a knife and "swirl" it through the mixtures to create a marbled effect ...

Bake in a moderate oven for around 40minutes or until a skewer inserted into the middle, comes out clean. Here's how mine looked at around 30 minutes ...

I put a layer of foil loosing over the top, to prevent it from becoming too dark. Once baked, allow it to cool in the tin for a few minutes, before turning out on a wire rack to cool completely ...

It looks so funky when it's sliced, the marbling effect makes ever slice looks different ...

You really can't go wrong with chocolate & orange. The texture of the loaf is lovely and light and a slice (or two) with an afternoon cup of tea or coffee is delicious!
There are some flavour combinations that just work better when they're together ... like rhubarb & custard, strawberries & cream or cheese & pickle! The same can be said of chocolate & orange ... a classic flavour pairing, that compliments each other perfectly. So this week's new recipe is a chocolate & orange marble loaf ... tasty & pretty!
It starts with all the usual cake requirements ...

I ♥ bitter dark chocolate and I think it works particularly well with the tangy orange zest. This recipe has BOTH! Start by melting the chocolate over a bain marie ...

Once melted, take it off the heat and allow it to cool down, but not re-set. Whilst it's cooling, cream together butter and sugar ...

Gradually mix in the eggs, making sure they're thoroughly combined, then add the grated zest of an orange ...

Add sifted flour and fold into the butter, sugar & egg mixture. Divide the batter into two bowls and add the cooled, melted chocolate and cocoa powder to one of them, combine together ...


Take spoonfuls of each of the batter mixtures and alternate them in a prepared baking tin / silicon mould ...

Take a knife and "swirl" it through the mixtures to create a marbled effect ...
Bake in a moderate oven for around 40minutes or until a skewer inserted into the middle, comes out clean. Here's how mine looked at around 30 minutes ...

I put a layer of foil loosing over the top, to prevent it from becoming too dark. Once baked, allow it to cool in the tin for a few minutes, before turning out on a wire rack to cool completely ...

It looks so funky when it's sliced, the marbling effect makes ever slice looks different ...

You really can't go wrong with chocolate & orange. The texture of the loaf is lovely and light and a slice (or two) with an afternoon cup of tea or coffee is delicious!
Wednesday, 6 June 2012
Oscraps London sub committee meeting ...

left to right: Diane (aka madi), Audrey (aka snowdropz), Ona (aka wombat146), me, Selena (aka bush girl) and Maya (aka madigirl)
It was such a pleasure to meet up with these lovely ladies yesterday. We chatted non stop for more than 6 hours and we probably would've carried on for much longer but alas, some of us needed to catch trains / boats in order to get home ... Diane & Maya travelled all the way from Holland to meet up with us ... thank you both!!!
I feel very privileged to have had the opportunity to meet up with my on-line friends in real life ... it really does make our friendship even more special ♥
Tuesday, 5 June 2012
It's Jubilicious ...

Getting ready to head into London to meet up with "the girls" from Oscraps ... oh, and perhaps take in some of the Jubilee celebrations too!
Monday, 4 June 2012
Recipe #20 of NEWrecipes52 ...
The rhubarb season is coming to an end and a friend at work gave me a BIG bunch of stalks from the patch, growing in her garden. Usually when I buy (or am given) rhubarb, I just make a traditional crumble and serve it with custard. This time, I wanted to try something a bit different. I wanted to combine the rhubarb and custard flavours into ... a cupcake!!!
A bit of online research and I came across this recipe on The Caked Crusader (great title!) blog. I used the recipe as inspiration but tweaked a few ingredients to suit my taste buds.
It all starts with rhubarb. Bright pink stems of sour goodness ...

First task was to wash the stems, after all, they'd just come straight from the garden (and I didn't want any little uninvited guests in my cakes!). I cut each stem into 1 inch chunks and put them into a large saucepan with just a couple of tablespoons of water and added a sprinkling of golden caster sugar, to take the edge off the tartness. The rhubarb was simmered for about 4-5 minutes, enough time to soften but not completely break down and loose it's shape. Once softened, I tipped the rhubarb into a colander to cool and to strain off all the juices, which would be used to create a deliciously tangy syrup to add to the cake and butter-cream mixes ...

The cake mix was a simple vanilla mix of sugar, butter, eggs and flour. The recipe called for milk to be added, but I used some of the rhubarb syrup instead ...

I didn't have any cupcake size cases, so I used muffin sized cases instead and still managed to get 11 cakes out of the mixture ...

Now onto the tricky bit! I didn't want my cakes to just be rhubarb & custard flavoured ... nooooo! I actually wanted to have rhubarb & custard INSIDE the cakes ... a little surprise centre waiting to ooze out when eaten.
The stewed rhubarb needed to be mushed (technical term!) and at first I tried doing this with a fork, but I didn't like the consistency ...

So instead, I put the fruit into my blender and whizzed it (another technical term!) into a beautifully smooth (and pretty looking) pale pink puree ...

Now to get the gooey goodness into the centre of my cupcake. I started by using one of my tiny biscuit cutters (no idea where I bought it from. Sorry!) ...

To make a hole in the centre of the cake ...

Into which, a dollop (yet another technical term!) of rhubarb puree was dropped ...

Followed by a teaspoon of custard (I used ready-made as I really couldn't be bother to make my own, but you certainly could, if you wanted too) ...

It's a messy job, but DH got to nibble on all the "centres" ...

We're almost done (thanks for reading this far!) ... now for the butter-cream topping. This is a fairly regular mix of icing sugar and butter, but for a twist, I threw in a couple of tablespoons of the ready made custard and some of that lovely pink rhubarb syrup ...

The mixture was wonderfully soft and fluffy and a dream to pipe onto the cupcakes themselves ...

And here's how they looked ...

I sliced through the cupcake so you can see the gooey centre. Of course, you don't see the inside bits when you're just biting into it ... and that's what makes these Rhubarb & Custard Surprise cupcakes such a hit!
Sunday, 3 June 2012
Recipe #19 of NEWrecipes52 ...
Looking for something quick, simple and oh so tasty for dinner? How about Pasta Provencal? I mean, just look at the fabulous array of colours ...

The basic recipe requires the following ingredients:
pasta (fresh or dried)
courgette
red pepper
onion
chopped tomatoes (tinned works best)
garlic
fresh basil
Start by chopping up all the vegetables. I sliced the pepper and courgette, diced the onion and crushed the garlic ...

Throw all the veggies into a frying pan and fry [gently] for about 5 minutes or until the courgettes begin to "give" a little ...

Add a tin of chopped tomatoes, some finely chopped fresh basil and season with some freshly ground black pepper ...

Because DH is a meat lover(!), I added in some [pre-cooked] sliced chorizo sausage. Yumm! If you haven't tried chorizo before, I urge you to buy some and try it. It's a spicy Spanish pork sausage, infused with pepper and chillies and when cooked, it produces the most amazingly vivid orange coloured oil, which BTW is great for frying the peppers / courgettes of this recipe in!
Whilst the sauce is simmering, cook the pasta. Spirals work well with this recipe because the sauce gets caught in the groves of the pasta ...

Drain the pasta well, then add it straight into the pan with the sauce. Stir it all together and ensure all the pasta is coated ...

I added another optional extra before serving ... I sprinkled some freshly grated Swiss Gruyere cheese over the pasta / sauce, then put the pan under a hot grill for a couple of minutes, just until the cheese melted.
Serve with a garnish of fresh basil leaves ...

A bowl of this pasta + a glass of chilled pinot grigio wine = food heaven! Seriously good and a recipe I'm definitely going to cook again [& again!]
Hello. Is anyone still there?
Yikes! I seriously must apologise for my blog silence over the past few weeks. It wasn't intentional. I just got wrapped up in other "stuff", none of which was particularly exciting and certainly not blog worthy. But having said that, there are a few things I need to share with you, like recipes #19 and #20 of my NEWrecipes52 adventure ... so prepare yourself for a [small] flurry of blog activity over the next few days, OK?
Subscribe to:
Comments (Atom)